


|
|
|
![]() Introduction
Introduction
![]() Equipment
Equipment
![]() Method
Method
![]() Calculations
Calculations
Producing a cross-section of a river
channel is a basic river fieldwork skill.
Whether you need to find the discharge, or examine the profile of a feature
such as a meander or riffle, it will be necessary to produce a cross-section
of the river.
The first stage is to measure the width and depth of the river. The data gathered can then be plotted to create a scale diagram of the cross-section, or used to find the cross-sectional area and wetted perimeter of the river.
A long, waterproof, tapemeasure
is needed to find the width of the river.
A rigid meter rule and / or a longer pole, such as a surveying pole, are needed
for the actual depth readings.
It's not really equipment, but if you are wearing a watch, check that it is
waterproof before doing this experiment. You will be putting
your hands under the water.
Stream Width
The width of the river must first be found. To do this, a tape measure can be stretched from one bank to the other at 90° to the course of the river. The start and finishing points for the measuring are the points at which the dry bank meets the water. To avoid drag induced by the tape making contact with the flowing water, and the consequent possible increase in distance measured due to the tape being stretched in to a curve, it should be stretched taught roughly 20cm above water level. The ends of the measured section should be determined by observation from directly above the tape at 90° to the ground. Observation from directly above the tape ensures that the margin of error is kept at a minimum.
It is possible that the river or stream only occupies part of the whole channel, and that in flood conditions the river expands and currently dry bank areas become part of the channel. If you wish to include a prediction of the river's characteristics when in flood you will need to also measure the bankfull width.
Bankfull Width
A tape measure should be stretched from one bank to the other at 90° to the course of the river. The start and finishing points for the measuring are the points where the vegetation and gradient of the bank suggest that the river has reached its maximum capacity. If the water were to rise above these points flooding of the surrounding area would occur. The tape is stretched taught between the measuring points. The ends of the measured section are determined by observation from directly above the tape at 90° to the ground. Observation from directly above the tape ensured that the margin of error was kept at a minimum.
Water Depth
Having established the width of the river, the next job is to find it's depth at regular intervals across it's width. The number of readings taken will depend upon the width of the river and the amount of detail you require. For most rivers intervals of 50cm are a good compromise between excessive work and loss of detail.
The tape measure which was stretched from one bank to the other can be used as a guide to ensure that you take measurements in a straight line. It is also a convenient way of measuring the intervals between readings.
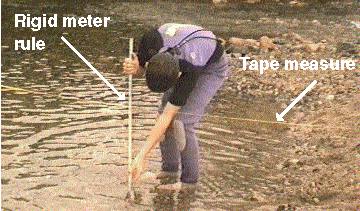
A rigid meter rule is immersed in the water, every 50cm, until it just touches the bed of the river. It is held with its edge facing upstream, thus reducing to a minimum the surface area exposed to the running water. It is necessary to reduce the exposed surface area for two reasons. Firstly, the water may be flowing quite rapidly in places and its force can be sufficient to bend it out of the desired position at 90° to the river bed. The bend induced in the rule could result in an apparent increase in the depth being measured. Secondly,the water, upon meeting the face of the rule will form a bow wave. This pressure wave may result in an increase in measured water depth upstream of the rule and a decrease in measured depth downstream. By positioning the rule with its narrowest edge facing into the flow it is most resistant to flexing and least able to create a bow wave. Errors in the readings are thus kept to a minimum.
If the water becomes too deep for a meter rule, a surveying pole or similar item can be used, the depth marked on it and then measured with a tape.
WARNING: If the water is so deep that you cannot use a meter rule, think very carefully about going into the river. Only go into deep water if you know what you are doing.

Always record each of the depth readings as you take it. NEVER rely on your memory.
Plotting your data onto graph paper is the same as drawing any other graph, with one major difference. Instead of measuring values up from zero at the bottom of the graph, you must measure then down from zero at the top of the graph. This is because you are plotting depths that go down from ground level.
Having drawn your cross-section by 'joining the dots' on your graph you have created a scale picture of a slice through the river. This diagram can be used to calculate the cross-sectional area or wetted perimeter of the river, which are needed to find discharge and channel efficiency.
![]()
We value
your ideas and suggestions. Please contact the
maintainer of this site.
This page
can be found at: http://www.geography-site.co.uk
Last update to
this statement was on:
February 20, 2006
© Copyright Geography Site